Zippers allow you to quickly and securely close your suitcase. They have just one downside: it's common for them to get stuck or break. Nothing's more frustrating than fighting a zipper when you're in a rush to make it to the airport or your destination. Fortunately, we have the answers on what to do when your suitcase zipper breaks. Read below for quick, temporary repairs you can use on the fly and advice on replacing your zipper.
The good news is that you can usually repair your malfunctioning zipper. Use zipper pliers to straighten misaligned or crooked teeth if your zipper separates. Then, realign the plates. If your zipper is stuck, check for loose thread in the teeth. You can use tweezers to remove it. Alternatively, you can use a graphite pencil or wax to lubricate the teeth and help the zipper glide along the track.
Keep in mind that repair is often a temporary solution. Using pliers or other forceful methods to fix your zipper can result in further wear and tear that leads to repeated breakage down the line.
In some situations, quick fixes won't do the trick. What should you do when your suitcase zipper is badly broken? You'll likely need to purchase and install a replacement zipper if the teeth separate, the slider comes off, or the zipper falls off the track.
Luckily, replacement zippers—and the tools you need to attach them—are readily available and relatively cheap. Scouring the internet or your local craft store for each part and tool can eat up a lot of time, as can meticulously sewing and plying your new zipper into place. Is there an easier solution?
FixnZip's zipper repair kits allow you to handle any zipper repair emergency gracefully. You can use our innovative zipper pull replacement to fix broken zippers without tools or sewing. The FixnZip® works on nylon coils, plastic teeth, and metal teeth and fits a wide range of zipper sizes so you can effortlessly repair your suitcase on the go. Purchase your kit today or contact us to learn more about how our product works.
It’s usually frustrating when a zipper breaks and you have to repair it. Sometimes the repairs can be as simple as taking a pair of thin pliers and gently bending some metal teeth back into position, while other times, you may need to replace the slider with a new one. If you want to know how to identify the kind of zipper you want to repair, understanding a little more about zipper brands, sizes, and styles may prove informative. Today, FixNZip is here to help you discover the things that you should watch out for when you need to make some zipper repairs.
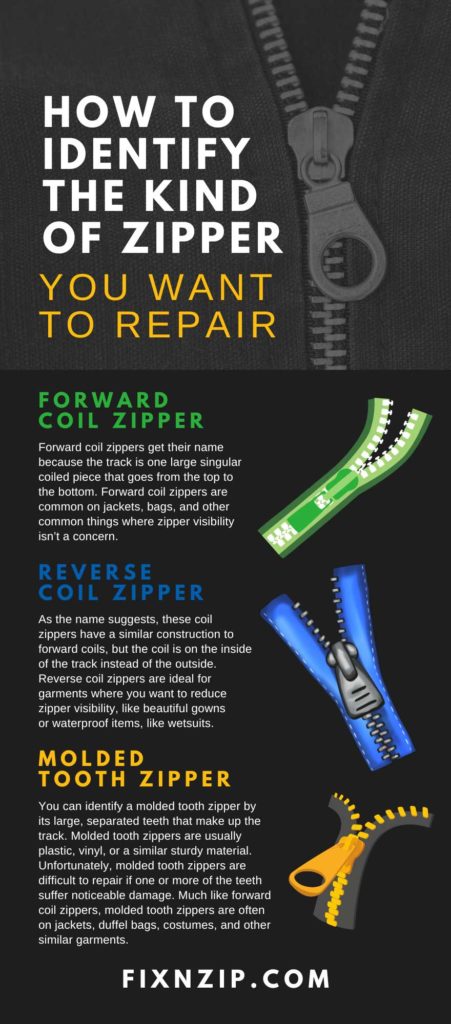
One of the first things you should identify is what zipper style is on your garment, bag, tent, or whatever you need to repair. Zippers come in many different styles that can change how the closed track looks and the general positioning of the slider.
Forward coil zippers get their name because the track is one large singular coiled piece that goes from the top to the bottom. Forward coil zippers are common on jackets, bags, and other common things where zipper visibility isn’t a concern.
As the name suggests, these coil zippers have a similar construction to forward coils, but the coil is on the inside of the track instead of the outside. Reverse coil zippers are ideal for garments where you want to reduce zipper visibility, like beautiful gowns or waterproof items, like wetsuits.
You can identify a molded tooth zipper by its large, separated teeth that make up the track. Molded tooth zippers are usually plastic, vinyl, or a similar sturdy material. Unfortunately, molded tooth zippers are difficult to repair if one or more of the teeth suffer noticeable damage. Much like forward coil zippers, molded tooth zippers are often on jackets, duffel bags, costumes, and other similar garments.
While metal zippers are a separate style from molded tooth zippers, their construction is very similar. The only difference is manufacturers make the teeth out of metal. Unlike most molded tooth zippers, metal teeth are slightly easier to repair if they become bent or damaged.
One of the best ways to identify the kind of zipper you want to repair is to know what brand you have. While there are several different makers and manufacturers of zippers, it may surprise you how often your garments and accessories use zippers from the same handful of zipper manufacturers.
Typically the best and most straightforward way to check for a zipper manufacturer is to examine the slider or the base of the zipper to find a logo or other identifying mark. Here are some of the most common brands you’ll likely see.
YKK, or to use its full name, “Yoshida Kogyo Kabushibibaisha,” is a Japanese zipper manufacturer, and we’re willing to bet that at least one thing you own with a zipper on it contains some of their handiwork. YKK is perhaps the most prominent zipper manufacturer in the world, and it earned that reputation by creating high-quality, reliable zippers that are affordable without skimping on durability.
YKK has zippers from almost every style, from the forward coil to metal and molded tooth zippers. They manufacture zippers for jeans, jackets, gowns, bags, tents, and more.
Riri zippers are from a zipper brand that has a reputation for being high-class. These are the zippers you see on high-end fashion and designer bags. Riri zippers are iconic for having stylish metal sliders that help give a style-over-substance feel. However, Riri zippers are no slouch when it comes to quality, and many people may agree that they’re well worth the cost for their extravagance.
If you want that style and visual flair of a Riri zipper but don’t want to pay those high prices, you may have better luck with a Glossy zipper. It may be unfair to call Glossy a knockoff, but they offer a similar style to the higher-end brands at a more affordable price. Naturally, the quality isn’t as high, but Glossy still provides reliable products that should fool all but the most astute of zipper fanatics.
After identifying the physical style and the manufacturer of your zipper, the largest thing left to determine is the size of the zipper. Many zippers have some indicator of the size of the zipper, slider, or another part to help you identify it. You may notice letters or numbers to give you an indication of the zipper size and style. Most commonly, you will see a number from one to 10, and these sizes are small, medium, and large.
People typically associate small zippers with smaller or fancier garments. You may find this size on dresses, gloves, couch cushions, pillows, pillowcases, or things where a smaller, more invisible zipper. The most common zipper size on jeans, slacks, or skirts is number four.
You’re likely to encounter medium size zippers on jackets, tents, duffel bags, and anything else that may require a little extra strength and size to fasten. Almost every style of zipper comes in at least one medium-size option.
Larger zippers may not be as common in our daily routine, but many heavy-duty pieces of equipment benefit from a large zipper. Some frequent uses of large-size zippers are grill covers, canvas tents, tire cases, and wetsuits. Many manufacturers have a number 10 option in almost any style. Since objects with large zippers frequently go through a lot of heavy-duty work, it helps to have replacement parts available.
If you want to learn more about zippers and fasteners and how to repair or replace them, FixNZip has everything you need. We have helpful guides on zipper slider replacements and extra parts to suit your needs. If you have any additional questions, comments, or concerns, please contact us at any time, and a friendly member of our team will help you get on the right track.
Your wedding day is one of the biggest days of your life. It’s a special opportunity to connect your life with another person’s and start a brand-new chapter. Unfortunately, the larger the event, the more likely it is that small problems will arise. To stay on the ball and stop those little issues in their tracks, here’s a helpful list of what to include in your wedding day emergency kit.
A wedding day emergency kit should always contain a small toiletry bag. Fill these bags with deodorant, travel toothbrushes and toothpaste, floss picks, hand sanitizer, baby wipes, cotton swabs, lotion, baby powder, or other essentials. If you have extra room, we recommend packing some light medicinal items like headache medicine or adhesive bandages.
When looking at what to include in your wedding day emergency kit, you can’t go wrong with a miniature sewing kit. A small variety of thread and needles allow you to make any quick touch-ups. Your kit should also contain fasteners like safety pins and replacement zipper slides.
One tip with a sewing kit is that you can use a safety pin and a small string or ribbon as a makeshift pulley for your zipper. That way, you can zip up your dress without damaging it in the rare event no one is around to help you.
Having a few backups jewelry pieces may not seem essential, especially if you already have some of your favorite jewelry picked out for your big day. It never hurts to have some extras, though, in case an earring breaks or clashes with your overall look.
Dress weights are something to consider if you’re having an outdoor ceremony. These weights serve the valuable purpose of sticking to the inside of your dress and preventing any awkward mishaps if the wind decides to pick up. It may be smart to have a few of these on hand for you and your bridesmaids.
You want to get everything ready ahead of time, but while you’re waiting for the ceremony to start, your stomach might start making a familiar rumble. To avoid getting hangry, keep some rations in your wedding emergency kit. You may want to avoid snacks that create crumbs or cheese dust, so stick to things like protein bars or jerky.
When you’re putting together your wedding day emergency kit and need some replacement zipper pulls for your sewing kit, FixnZip is here for you. We have helpful blogs that will teach you how to take care of your dresses and garments, and specialists are available anytime. Feel free to contact us with any additional questions, comments, or concerns.
Zippers on gear are usually made of either metal or plastic. Both options have advantages and disadvantages in various regards. If you’re wondering which zippers are easiest to repair, it depends on the part of the zipper that needs repairing. Below, we’ll discuss whether the parts of plastic or metal zippers are easier to repair.
One of the most common zipper parts that need repairing is the slider. Fortunately, replacing the slider on both a plastic zipper and a metal zipper requires a similar process. Regardless of the material, you will need to remove the top stop and take the slider off the track. However, it may be easier to remove a metal top stop with a pair of needle-nose pliers without damaging the tape than to break off a plastic one. So even though the repair process is similar, you may have an easier time with a metal zipper.
When looking at if plastic or metal zippers are the easiest to repair, the teeth are one of the biggest indicators. With metal teeth, it’s much easier to make minor repairs thanks to pliers and being able to gently squeeze or crimp the metal back into place. On the other hand, if one of the teeth on a plastic zipper warps too much or breaks off, it’s not feasible to make repairs and may require replacing.
While metal zippers are generally easier to repair, plastic zippers have their own advantages. Many marine fabricators enjoy using plastic zippers because they often last longer and are not susceptible to rust or other common elemental damage. Both zipper types are good options for your gear, but if you value easy repair above all else, then metal zippers may be the way to go.
For more information on keeping your zippers in good shape, or if you’re interested in zipper repair kits, FixnZip has everything you need. If you have any questions, comments, or concerns, please contact a member of our team, and we’ll be happy to assist.
It’s never a fun experience when you go to zip something up and discover that the slider won’t budge. You can try forcing it, but that risks damaging the teeth or breaking the slider. One of the most common solutions is using a specialized zipper lubricant to get it moving again, but many people don’t pick that up until it’s too late. If you don’t have any lying around the house, worry not! Here are four DIY tips for loosening up a tight zipper.
One helpful way to get your zippers moving again is by using baby powder. If you don’t have that on hand, other similar powders like talcum powder or corn starch can work too. Gently sprinkling small amounts of the powder near the slider will help get things moving.
One problem with this solution is that it can be messy, and trying to get the white powder off your fabrics may be a hassle. One solution is to mix the powder with a small amount of water and use a small brush to apply it around the zipper to make less of a mess.
The natural consistency of olive oil is a great way to lubricate a zipper. Olive oil is aromatic and easy to apply, and you should only need a drop or two to get things moving again. Once your zipper is unstuck, use a warm, damp paper towel to wipe off the excess oil.
WD-40 is widely considered one of the most essential household items. If you have something that should move and it’s not, a small spritz of WD-40 will probably get it going. This is an all-purpose chemical, but it works better for things like scuba suits and tents instead of your favorite dress.
If you have a pencil in your home, you can access one of the best DIY tips for loosening up a tight zipper. Take the pencil, tilt it slightly to the side, and lightly scrub the graphite on both sides of the zipper. The shavings help loosen things up and allow you to open and close your stuck zipper easily.
If you do find yourself needing new zipper parts or want to learn more about the maintenance and repair of zippers, FixnZip has everything you need. Please contact a member of our team anytime with any questions, comments, or concerns.
Sometimes, you dig something out of storage and discover the zipper won’t slide. A jammed zipper is never a good experience, but here are three simple ways to make a zipper slide easier. You can do most of these methods with objects you have lying around the house. But in the case of a particularly stubborn stuck zipper, you may need to make a trip to the local hardware or craft store.
One of the most common and straightforward methods for making a zipper slide easier is to use some specialized lubricant. You can find this lubricant in most stores that carry zipper repair kits or replacement sliders. Typically, you want to apply a few drops along both sides of the zipper track and spread it around, carefully wiping off any excess. Once the lubricant sets in, your zipper should slide smoothly.
Maybe you don’t have any specialized zipper lubricant on hand and you’re unable to get to the store to pick some up. Thankfully, many common household objects are great and simple ways to make a zipper slide easier. Here are three items available in your desk or pantry to get your zipper moving again.
Sometimes, the main thing preventing you from moving your zipper is debris stuck in the track. Grabbing a small, soft-bristled brush like a toothbrush and cleaning out the track is a vital step in getting your zipper moving again.
Whether you’re using a storebought or home solution, getting your zippers in working order is our top priority. FixNZip has everything you need, from replacement zipper pulls to helpful guides and instructions on keeping things moving. Contact us today with any additional questions, and a knowledgeable team member will be happy to assist you.
There are times when you may find yourself in need of a quick zipper repair. Whether you want to fix the front of your favorite jacket since the days are getting colder or need to fix your tent before you head out on your big camping trip, having working zippers is vital.
In many cases, you can take your garments or other items to a tailor or other professional who can make the repairs for you. However, in the time it takes you to look up a place to bring your busted zipper, you may have been able to fix it yourself.
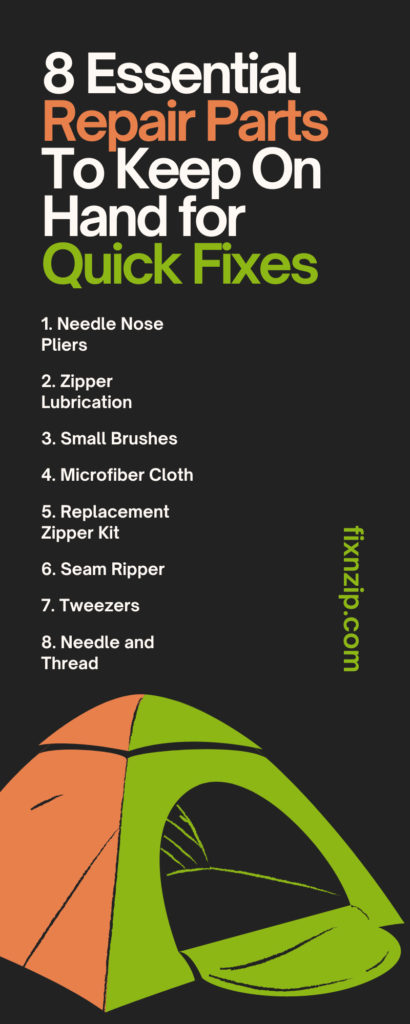
There are some jobs where a professional may be the right option, but you can take care of plenty of minor repair tasks from your kitchen table. Here are eight essential repair parts to keep on hand for quick fixes so you can save time and money by repairing your zippers at home.
A good pair of pliers is one of the most helpful tools to have when making repairs. Many people prefer to use needle nose pliers because the thin tip makes them easier to work with and grip onto a more precise area. It may be a good idea to have a couple of different sizes so you can choose which works better for the item you're trying to repair.
Many zippers, especially those found on jackets, stay attached to the garment thanks to a top and bottom stop that prevents them from sliding off. If you’re making repairs, needle nose pliers are good for disconnecting these stoppers so that you can put on a new slider and reattach the new stoppers by bending the teeth into the fabric.
In some instances, the teeth on the main track of a zipper may become bent or crooked. A precise pair of needle nose pliers allow you to make quick and easy adjustments to form the metal closer to its original positioning. Having a few pairs of pliers is crucial if you're putting together a small toolbox for zipper repair.
In many situations, a zipper isn’t broken in the traditional sense but stuck or jammed, so you can't open or close it very well. In these situations, it helps to have some lubrication in your kit, and you might be able to fix it without much issue.
You can buy specialized zipper lubrication online or at most craft or hobby stores, and applying a little of the lubrication to both sides of the zipper track and then gently sliding the pull up and down to get it moving is one option to get it working again. We recommend having some of this lubrication available, but if you don’t, there are a couple of other options.
A few ways to loosen and lubricate a zipper without the designated product are to use a few drops of olive oil around the zipper pull or to rub gently on both sides of the zipper with a graphite pencil.
Depending on the condition of the area you store your items in, the zipper may collect dirt, dust, or other similar debris. Often, one of the main reasons a zipper may become jammed or stuck is from these irritants getting caught in the teeth and inside the slider.
When you’re repairing a stuck zipper like this, it helps to have a small, soft-bristled brush to clear the build-up. A toothbrush will work as a good solution, but other brushes you can find at hobby stores might be good for the long run.
When you're repairing zippers, after brushing and lubricating, you may want something to clean everything off or help dry them after using oil. A small microfiber cloth in your repair kit enables you to tidy up and continue with any further steps in the repair process without having to wait for the zipper to dry. We recommend a microfiber cloth because the delicate fibers will not scratch or damage the metal, leading to further problems.
A good repair kit is one of the most important things when you’re gathering the essential repair parts to keep on hand for quick fixes. Repair kits typically come with at least one replacement slider for the size you need and spare top and bottom stops.
The individual pieces may vary from kit to kit, and some may come with spare tape and teeth if you need to completely replace the zipper instead of just the slider. If you need help determining what size zipper pull you need, you may often see a size number written on the base of the slider to give you an idea of where to start. We recommend keeping a few spares on hand in some of the more common sizes if you want to be able to make quick repairs.
There are times when you may need to remove the entire track of the zipper, and one of the easiest ways to do that is to grab a seam ripper and carefully pull out the threads connecting your zipper to the garment or other item. Seam rippers allow you to separate the zipper while minimizing overall damage to the rest of the time.
When you're making quick repairs and removing the zipper tape, having a pair of tweezers or a similar tool allows you to pluck out lingering threads that may remain in the fabric you want to remove.
Having a needle and thread on hand is crucial if you need to sew in a new zipper track. If you know how to sew, attaching a new zipper or attempting to affix a ripped portion back to the main body of your item is easier with a needle and thread. It helps to have a couple of different thread colors to closely match the main fabric and keep things from standing out too much.
To learn more about how to fix a zipper and the tools you need to make those repairs, FixnZip has everything you need. We have helpful blog posts covering various topics and several practical replacement zipper parts to add to your kit. For more details, contact us anytime, and a helpful, friendly member of our staff will be happy to help you find the information you need.
It’s never a good feeling when you pull your winter coat from the closet and find that the zipper is stuck or not working after all those months in storage. However, instead of paying someone else to replace the zipper or buying a whole new garment, here are some of the top reasons to try to repair a zipper yourself.
Depending on the item and the condition of the zipper, you may not need to do much to repair it. If the tape is still attached to the garment and the teeth are still in good condition, the problem may simply be that the zipper is jammed. Applying some lubricant to the zipper to get it sliding again and cleaning out the track with a small brush may be the quick fix you need.
One of the top reasons to try to repair a zipper yourself is how much time and money you might be able to save. Even if you need to buy some replacement zipper parts or tools, it’s a small investment compared to the cost of a professional repair. Replacing a zipper slider is generally possible with a pair of needle-nose pliers and the right-size slider replacement.
It’s possible that the repair may require more than a quick replacement part. You may need to buy a whole new zipper and sew it on yourself. Depending on the size or complexity of the zipper, there are times when hiring a professional to repair it may be beneficial. However, if you find yourself ready to grab a needle and thread and try to get it on yourself, there’s a great sense of accomplishment in repairing your garments. It feels great taking something that wasn’t working and being the reason it’s ready to wear again.
If you need a zipper repair kit for your next job or want to learn more about repairing the zippers on bags, jackets, and everything in between, FixnZip has what you need. Browse through our catalog or contact us anytime to speak to a member of our staff with any questions, comments, or concerns.
When you bring your boat out for the day, you may want to protect yourself from the sun with the Bimini top. This top is a large piece of canvas fabric found on many different types of boats. Thanks to some helpful zippers, the material typically connects to a collapsible metal frame.
While the Bimini top helps provide shade from the sun, it’s not much help against wind or rain. Since many people leave the top on the frame when storing their boat, sometimes, the zipper may become stuck or corroded. If this happens, here’s the best way to repair a Bimini top zipper without needing to replace the entire canvas.
Because many people store their boats outdoors or in musty storage areas, it’s not uncommon for the zipper to suffer from jams or become stuck. You may notice dust or dirt in the track of the zipper that makes it difficult to open and close.
Perhaps the easiest solution to a jammed zipper is to use a silicone lubricant. Spraying a lubricant along the zipper will help loosen it up. Move the slider back and forth to see if it’s working as intended, and use a small brush to clean out the teeth and remove potential dirt. Fortunately, the material of the Bimini top is at no risk if you accidentally spray some of the lubricant onto it.
After exposure to heavy wind or rain, the slider on the zipper of your Bimini top may break off and need replacing. Thankfully, the best way to repair a Bimini top zipper is very similar to replacing the zipper on a jacket or similar garment.
Most Bimini tops use a double-sided slider and have a much longer track, but repairs work about the same. Use pliers to remove the top stop and the older slider. When you attach the new slider, try moving it from both sides to ensure it’s moving correctly and fastening the zipper as intended before connecting a new top stop.
In a worst-case scenario, you may need to replace the entire zipper and track if there are damages to the track or rips in the enclosure panel of the Bimini top. If there are open tears between the zipper ribbon and the top, you should be able to use a needle and thread to sew it back together. For more extensive damage, you may need to remove the entire track and sew a new one on yourself or bring it to a marine equipment shop.
For more information on zipper repair for scuba gear, camping equipment, and more, FixnZip has helpful blogs and replacement parts for all your needs. Contact us today for more information.
When scuba diving, you generally wear a wetsuit. However, a drysuit is a safe and preferable option in colder waters. A drysuit's specific material and structure work to insulate your body heat and create a tight seal so that you don't get wet, even in water.
Naturally, you want to take good care of your drysuit so that it can continue to perform these specialized functions. FixnZip is here with helpful tips for maintaining and repairing a scuba drysuit zipper so you can get the most out of your equipment.
It's always a good idea to apply wax to the zippers of your drysuit before pulling them up. Wax helps ensure the zipper glides with little resistance. Remember only to apply wax to the outer parts of the zipper so that it doesn't interfere with the sealing setup of the interior. After applying the wax, pull the zipper slowly and gently, and unzip the suit only when necessary.
Part of maintaining and repairing a scuba drysuit zipper is knowing when to apply the necessary steps. After your dive, remove the drysuit and lay it out flat on a table with the zipper undone. Take a small, soft-bristled brush and go over the exterior of the zipper to clean out sand, dirt, and salt.
With many garments, you zip them up before storing them. You should move a drysuit’s zipper as little as possible. We advise you to leave it open but maintain a straight shape. Use an airtight bag to store your drysuit and prevent exposing the zipper to moisture in the air and causing corrosion.
For more information on zipper parts, tips, and tricks for zipper care on all your clothing, gear, and equipment, FixnZip has what you need. Browse through our blog for more information, or contact one of our specialists today to find the right parts for you.