Have you ever struggled to open your tent, sleeping bag, or backpack because your zipper only has one pull? Whether you’re inside your tent trying to zip it shut or fumbling with your sleeping bag in the dark, adding a second zipper pull can make life a lot easier.
The FixnZip Replacement Zipper Pull allows you to add a second pull to your FixnZip Replacement Zipper Slider, giving you smooth and easy access from both sides—without any tools or sewing!
If your zipper is used frequently or needs to be opened from both sides, a second pull is a game-changer. Here’s why:
✅ Easy Tent Entry & Exit: Zip up your tent from inside or outside effortlessly.
✅ Convenient Sleeping Bag Access: No more struggling to reach your zipper in the middle of the night.
✅ Better Backpack & Jacket Functionality: Access your gear without twisting or adjusting awkwardly.
Our FixnZip Replacement Zipper Pulls are made from durable materials and come in four stylish colors: Black, Nickel, Graphite, and Dark Nickel.
Whether you’re an avid camper, hiker, or backpacker, this simple zipper pull repair trick will improve your outdoor experience.
Order yours today at FixnZip.com or find it on Amazon!
A broken zipper pull can make jackets, backpacks, tents, and luggage frustrating to use. Instead of replacing the entire zipper or struggling with makeshift fixes, the FixnZip Replacement Zipper Pull provides an easy, no-sew solution for zipper pull repair.
With no tools required, you can replace a missing or damaged zipper pull in seconds—restoring your zipper to full functionality without the hassle of sewing or repairs.
🔹 No tools or sewing needed – Simply clip it on!
🔹 Works on all types of zippers – Jackets, backpacks, tents, luggage, and more.
🔹 Durable & stylish – Available in Black, Nickel, Graphite, and Dark Nickel.
🔹 Saves time & money – No need to replace the entire zipper.
Whether you’re dealing with a broken jacket zipper, a worn-out backpack zipper, or a missing tent zipper pull, the FixnZip Replacement Zipper Pull is the fastest and easiest way to fix your zipper without replacing the entire thing.
Get yours now at FixnZip.com or find it on Amazon!
Introducing FixATent: The Ultimate Tent Repair Kit for Every Camper
When you’re out in the wild, the last thing you want is a broken tent standing between you and a great adventure. A busted tent zipper, a torn tent mesh, or a snapped tent pole can turn an amazing camping trip into a frustrating experience. But don’t worry—we’ve got you covered! Meet the FixATent Tent Repair Kit, the all-in-one tent repair solution that keeps your tent in top shape, no matter what nature throws your way.
Imagine setting up camp under a sky full of stars, only to realize your tent zipper slider won’t close properly, or worse, your tent poles are bent. With the FixATent Tent Repair Kit, you can tackle these issues on the spot, ensuring your trip remains stress-free. This compact and lightweight kit includes everything you need to repair your tent in minutes, saving you time, hassle, and money.
Buying all these tent repair essentials separately could cost you over $50, but FixATent gives you the full package for just $29.99. Now, you can be prepared without breaking the bank!
Each tent repair kit includes high-quality, durable tools to handle a variety of tent repairs, including:
✔ FixnZip Medium Nickel Replacement Zipper Slider – A universal tent zipper repair solution that quickly fixes broken tent door zippers and keeps bugs and the cold air out. ✔ FixnZip Nickel Replacement Zipper Pull Tab – Replace or reattach a missing tent zipper pull tab for a smooth and secure zipper function. ✔ Tent Pole Splints (1/2" & 5/8") – Quickly repair snapped or cracked tent poles with these durable tent pole repair sleeves, designed for both small and large camping tents. ✔ 10' Roll of Duct Tape – A must-have for emergency tent repairs, from reinforcing tent poles to patching up unexpected tent fabric tears. ✔ 25' Shock Cord (Elastic/Bungee Cord) – Essential for replacing broken tent shock cords, tent guy lines, or other elastic tent repair needs. ✔ 2 Self-Adhesive Screen Patches (4" x 4") – Fix rips or holes in your tent mesh screen with ease, keeping insects out while maintaining ventilation. ✔ 2" Carabiner – Perfect for hanging your tent repair kit, securing loose camping gear, or keeping important items clipped and accessible during your trip.
✅ All-in-One Tent Repair Solution: Say goodbye to searching for individual tent repair items—this kit has everything you need in one place. ✅ Lightweight & Portable: Designed for campers, hikers, and backpackers, it won’t weigh down your pack. ✅ Cost-Effective Tent Repair Kit: Get more for your money with a camping repair kit that saves you over 50% compared to buying each item separately. ✅ Reliable & Durable: Made from high-quality camping gear materials, each tool in the kit is built to last—even in tough outdoor conditions.
A damaged tent can put a damper on your adventure, but with FixATent, you’ll always have a tent repair kit at your fingertips. Whether you’re camping, hiking, or exploring the great outdoors, this kit ensures that small tent repairs won’t ruin your experience.
Don’t let an unexpected tent repair emergency cut your trip short—get the FixATent Tent Repair Kit today and camp with confidence!
👉 Buy now at FixnZip and Amazon!
Do you ever put on your favorite skirt or jacket and find an abnormal curvature in the zipper that sticks out? This oddly shaped extension is, at best, unsightly and, at worst, physically uncomfortable. There are a few different names for this phenomenon, but typically, it’s called puckering. Today, we’re going to look at what zipper puckering is and how you can fix it.
Zipper puckering, sometimes known as bulging, is when your zipper curves or bends on a garment or bag in a way that causes it to stick out in a small bump or wrinkle. This bulge looks sloppy, improper, and peculiar on many pieces of clothing. In some situations, the areas where your zipper puckers may pinch or cling to your body in a physically uncomfortable manner. Either way, it’s not something you typically want to have on your clothes.
Many things can result in zipper puckering, and some are easier to avoid than others. One of the most common causes you often see on zip-up sweatshirts is that the front zipper undulates and curves. The usual reason for this is during the cleaning process, the fabric shrinks slightly in such a way that the zipper needs to curve to accommodate the smaller frame. Other common causes are zipper teeth becoming misaligned and requiring some form of adjustment.
Now that you know what zipper puckering is, you may be wondering how you fix it. The way to fix the puckering may depend on what caused it in the first place. One common option is to carefully go over your zipper with a brush and clean out any dirt or debris. Bunched-up gunk can cause zipper bulging and mess with your slider. If your teeth are misaligned, take a pair of needle-nose pliers and try and straighten them out. If the bulge is from shrunk fabric, you may be able to gently soak your garment in warm water for half an hour and let your clothes air dry on a flat surface. In more severe situations, you may need to replace the entire zipper.
For more tips on how to fix a zipper or how to replace the slider, FixnZip is here for all your fastener needs. We have replacement sliders for all available zipper sizes and many helpful guides to ensure that your clothes, bags, and other needs are accounted for. To learn more, please feel free to contact us anytime, and an associate will be happy to assist you.
Whether on a backpack, purse, or an article of clothing, zippers are what we use to fasten things together. Most of us probably don’t think about how the zipper has grown or evolved since the earliest iterations. However, the invention and production of the zipper have a rich and fascinating history that links back to a man named Gideon Sundback: the father of the modern zipper.
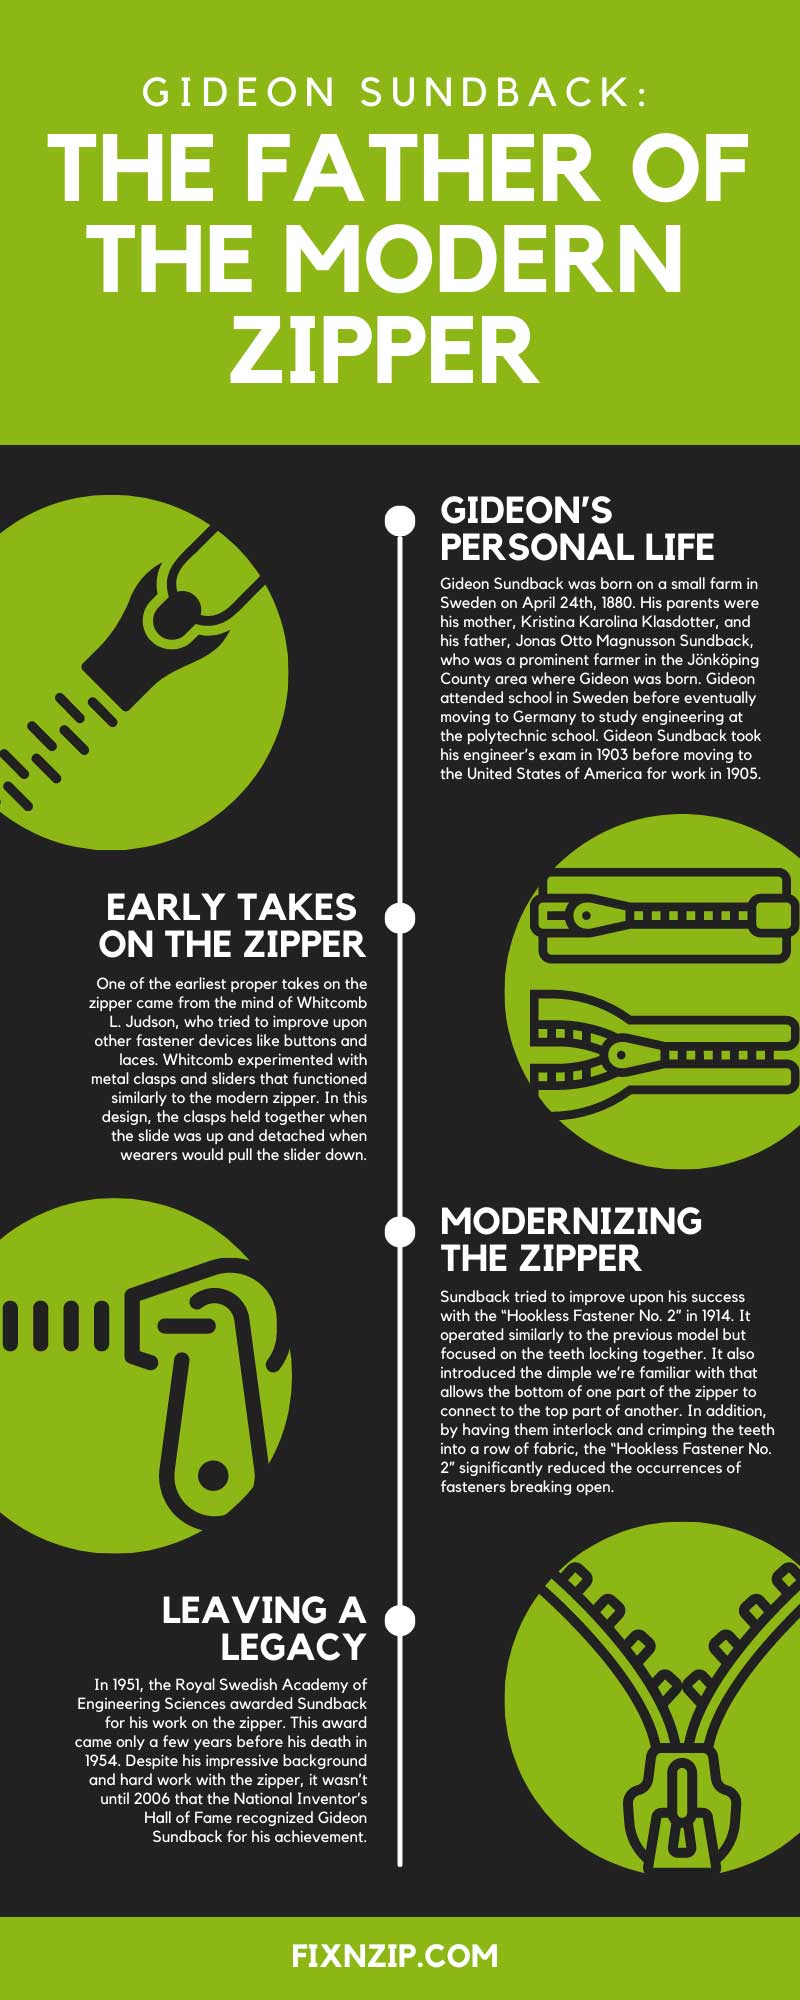
Gideon Sundback was born on a small farm in Sweden on April 24th, 1880. His parents were his mother, Kristina Karolina Klasdotter, and his father, Jonas Otto Magnusson Sundback, who was a prominent farmer in the Jönköping County area where Gideon was born. Gideon attended school in Sweden before eventually moving to Germany to study engineering at the polytechnic school. Gideon Sundback took his engineer’s exam in 1903 before moving to the United States of America for work in 1905.
Gideon lived in Pittsburgh, Pennsylvania, and got a job working at the Westinghouse Electric and Manufacturing Company. Westinghouse was once the biggest electrical infrastructure in the United States and employed other renowned names like Nikola Tesla and Bertha Lamme. However, Sundback only worked at Westinghouse for a year before moving to Hoboken, New Jersey, and gaining employment at the Universal Fastener Company in 1906. Sundback eventually married Elvira Aronson, the daughter of the plant manager, in 1909, a few years after he’d begun work on his new zipper design.
While we often refer to Gideon Sundback as the father of the modern zipper, the keyword to take from that is “modern.” It’s impossible to overstate Gideon’s work, but nearly everything he brought to the world came from early ideas, sketches, and designs from other engineers.
One of the earliest proper takes on the zipper came from the mind of Whitcomb L. Judson, who tried to improve upon other fastener devices like buttons and laces. Whitcomb experimented with metal clasps and sliders that functioned similarly to the modern zipper. In this design, the clasps held together when the slide was up and detached when wearers would pull the slider down.
One of the largest problems with the older Judson design, which had the working name of the “Judson C-curity Fastener,” was that the metal clasps rarely held together. Pressure from the inside of work boots or bags would cause the clasps to pop open, regardless of the slider’s position. Gideon Sundback wanted to try working with this design and improving upon it.
Earlier versions of Sundback’s attempts resulted in similar failures. The clasps would continuously burst open, and the metal fasteners proved less effective than other options. However, Sundback believed there was potential with this design and finally cracked the code in 1913.
The general idea was simple. If the metal fasteners kept bursting open, they needed to be held more tightly together. Ideas for Sundback’s “Hookless Fastener No. 1” increased the number of metal clasps alongside the fastener from four per inch to roughly 10. The two separate rows of teeth would pull together and lock more together from the slider, pulling them in a given direction. Sundback’s hookless fastener was the first iteration of the zipper that closely resembled the modern form.
Sundback tried to improve upon his success with the “Hookless Fastener No. 2” in 1914. It operated similarly to the previous model but focused on the teeth locking together. It also introduced the dimple we’re familiar with that allows the bottom of one part of the zipper to connect to the top part of another. In addition, by having them interlock and crimping the teeth into a row of fabric, the “Hookless Fastener No. 2” significantly reduced the occurrences of fasteners breaking open.
This design would eventually be the one that Sundback would sketch and use to apply for an official patent. Sunback submitted sketches to the patent office for his “Separable Fastener” on August 24th, 1914. The sketches showcased a Y-shaped slider and detailed drawings to showcase how the teeth could lock the fasteners in place. Patent clerks carefully analyzed the sketches and toyed with Sundback’s design until the separable fastener received official US patent 1,219,881 on March 20th, 1917.
Apart from creating the fastener and patenting it, Sundback put his engineering skills to work and created a machine to manufacture a long continuous chain of zipper teeth. This chain could be cut to any length and given a fastener. Shortly after beginning production, Sundback’s machine was making hundreds of feet worth of zipper per day.
While Sundback improved upon early designs and notes to patent, create, and manufacture what we now know as the zipper, the name itself came from a completely different source. US industrialist B.F. Goodrich pitched the name “zipper” after seeing how the fasteners worked on the boots that his plant was producing. The story goes that “zip” was a pleasant onomatopoeic sound effect from the slider moving up and down. This was a much catchier and snappier name than Sundback’s “separable fastener.”
In the early days, people mainly used zippers for boots and small pouches. Then, in the 1940s, they caught on in the fashion industry and became a widely accepted fastener option for dresses, slacks, jackets, and other garments.
In 1951, the Royal Swedish Academy of Engineering Sciences awarded Sundback for his work on the zipper. This award came only a few years before his death in 1954. Despite his impressive background and hard work with the zipper, it wasn’t until 2006 that the National Inventor’s Hall of Fame recognized Gideon Sundback for his achievement. To this day, Gideon’s quest to improve upon existing metal clasp designs with a focus on engineering and manufacturing enriches our lives and provides us with endless convenience.
If you’d like to learn more about zippers or read helpful guides on zipper repair, FixnZip is here for you. We have several useful blogs and are your one-stop shop for replacement zipper parts and sliders in several shapes and styles. Please browse through our catalog or contact us anytime with additional questions, comments, or concerns, and a member of our team will get you on the right track.
Invisible zippers are popular with outdoor gear, raincoats, and dresses. The advantage is that the track, slider, and teeth are all inside the garment, so you can hardly see it from the outside when you close the zipper. Not only do invisible zippers provide a distinct look that many appreciate, but the positioning also protects the zipper from water damage and other potential hazards. Here are four quick tips for repairing an invisible zipper you may want to consider if you notice some problems.
If the main problem with your zipper is that you're having trouble sliding it, cleaning it may be an easy fix. Use a soft-bristled brush along the underside of the invisible zipper to clear out dirt or dust. You may also want to use a few drops of a zipper lubricant or other home remedies, like pencil graphite or olive oil, to loosen it up.
Installing a new slider is a quick tip for repairing an invisible zipper. Use pliers to remove the bottom stop and the current slider. After installing a new one, attach a new bottom stop and give the slider a few test zips to see that it’s properly working.
One advantage of invisible zippers is that they're typically metal. Sometimes, the biggest problem with a metal zipper is that the teeth bend or move. A quick fix may be to identify where the zipper is giving you problems and adjust the teeth back into the right shape. You can also position them with needle-nose pliers.
Replacing the tape is time-consuming, but you may need to do it if other methods aren't solving the problem. Use a seam ripper to carefully remove the zipper and any loose threads from your gear or garment. Hold the zipper in place with pins, and carefully run it through a sewing machine for the quickest and best results.
FixnZip can help you learn more about zipper replacements and maintenance. When you’re ready to buy a new zipper slide, the FixnZip® is the best slider for your needs. We have a wide selection of high-quality and affordable zipper slider replacements in different shapes and sizes for your next big project or repair job. Reach out to a member of our staff with any additional questions, comments, or concerns, and we'll be happy to get you on the right track.
No one wants to throw away their favorite jacket. You dig your hoodie out every year when it gets a little chilly, but at some point, the zipper may not work as well as it used to. Instead of tossing the whole thing out, consider one of these four simple tips for repairing a hoodie zipper. Hopefully, these tricks will get you more time with your warm coat.
If the zipper occasionally jams or has trouble sliding, you may just need to lubricate it a little bit. You can use a designated zipper lubricant, but a much more accessible option is to rub a graphite pencil around where the zipper pull is stuck. The graphite should help loosen it up and get the zipper back to proper working order.
If your hoodie has a metal zipper track, some of the teeth may be bent and you might need to make some adjustments. Fortunately, you can grab a pair of needle-nose pliers and carefully bend or crimp any errant metal to realign the teeth. It’s worth noting that this method doesn’t work very well if you have a plastic zipper.
One simple tip for repairing a hoodie zipper is to replace the slider if it’s too damaged. Zipper repair kits come with all the parts you need for replacement, and you can use your needle-nose pliers to remove the bottom stop and pull the slider off. Install the new slider and give it a few practice slides to make sure it’s moving smoothly before reattaching the bottom stop.
In a worst-case scenario, you may need to remove the entire zipper and replace it. You can use a seam ripper to carefully undo the stitches that keep your zipper in place. Then, use a needle and thread to attach a replacement and enjoy all the benefits of a clean, new zipper. This way, you won’t need to throw away your favorite hoodie.
To learn more about how to fix a zipper and how different methods work for different clothing, gear, or equipment, FixnZip is here for you. We have the best zipper replacement kits on the market, and helpful guides to lead you through any problem. For more information or to reach out to one of our specialists, please contact us anytime; we’ll be happy to get things on the right track for you.
If your Jeep’s soft top is in great shape other than the zipper, it can be hard to rationalize replacing the entire thing. The great news is that zipper issues are often easy to fix. Here’s a quick guide to repairing a Jeep soft-top zipper.
Candle wax and bar soap are surprisingly effective lubricants. To fix a stuck zipper, clean everything with soapy water and grab a pair of pliers. Get the zipper moving a few inches, and then rub your soap or candle onto the zipper’s teeth. Pull the zipper back down over the waxed section, and zip it back and forth.
This process works wax into the zipper mechanism, helping it run smoothly. Your zipper should be sliding smoother now. Repeat this process on the rest of the zipper track.
Note: do not use oil or Vaseline for this trick. Though they may work short term, sticky substances will trap dirt, making your problem worse in the long run.
A missing zipper tooth is a bigger issue than it may appear to be. This missing tooth will either prevent the zipper from closing or cause the zipper to separate once it does close. Search for a replacement on your soft top itself; you likely won’t need to buy a brand-new part.
Check for any zippers that don’t close all the way. The zippers along the roof are a good place to start. These zippers usually have a few teeth at the end that go unused. Remove them and replace them in your zipper gap.
Cut these replacement teeth free using a razor blade and needle nose pliers. Remove any excess fabric from the tooth channel. Slide the replacement tooth into the zipper gap and slide the zipper across it a few times. This allows the tooth to move slightly to mesh well with the other teeth. Place a small amount of superglue on the end of a toothpick or small flathead screwdriver and wiggle it under the tooth to glue the tooth to the fabric.
If your soft top is damaged, you may need to buy some replacement parts. Luckily, this should be inexpensive. Fix N Zip makes affordable, high-quality replacement zipper pulls that are designed for durability. Simply loosen the thumbscrew on the zipper pull, place the zipper on the track, and tighten. It really is that easy.
We hope you enjoyed our quick guide to repairing a Jeep soft-top zipper. Fix N Zip is here to keep your Jeep—and zipper—running smoothly.
With many devices, manufacturers go the extra mile to waterproof their zippers. Objects like raincoats, tents, luggage, and other items that benefit from keeping dry often utilize waterproof zippers. But how are these zippers different, and what do you need to know about repairing waterproof zippers? FixnZip has the answers for you.
Waterproof zippers have a few differences from most standard fasteners. These zippers typically utilize materials other than metal, such as PVC or other similar polymers. Many metal waterproof zippers have a protective coating made of wax, resin, or other materials to create a barrier.
The construction of the zipper may also differ. With waterproof zippers, the teeth and slider are often invisible when closed. This covering allows the exterior fabric to provide additional protection to the zipper and reduces exposure to water. However, this may make things slightly harder to access when making repairs, so be aware.
Aside from having additional protection over the top, many waterproof or water-resistant zippers have tape qualities that are crucial to be aware of. One thing to know about repairing waterproof zippers is that the construction might differ slightly from zippers on other devices. To create a tighter bond that keeps water out, the slider is on the opposite side of the tape from the teeth or chain. This adds an extra layer of protection but means you need to be careful about where you put a replacement slider.
Repairing a waterproof zipper involves removing the stoppers and replacing the slider correctly before using pliers or similar tools to install a new one. When dealing with garments or other items utilizing waterproof zippers, we do have a few suggestions for keeping them in good condition. Avoiding intense heat from washing in hot water or ironing prevents damage to the polymer material or any protective coating.
If you have a tent or jacket with a waterproof zipper, it’s only natural you want to keep it in good working condition so you’re not stuck in the rain. For any information on replacement zipper pulls and how to install them, the experts at FixnZip have everything you need to get things started. Stay dry and contact us today for more details.
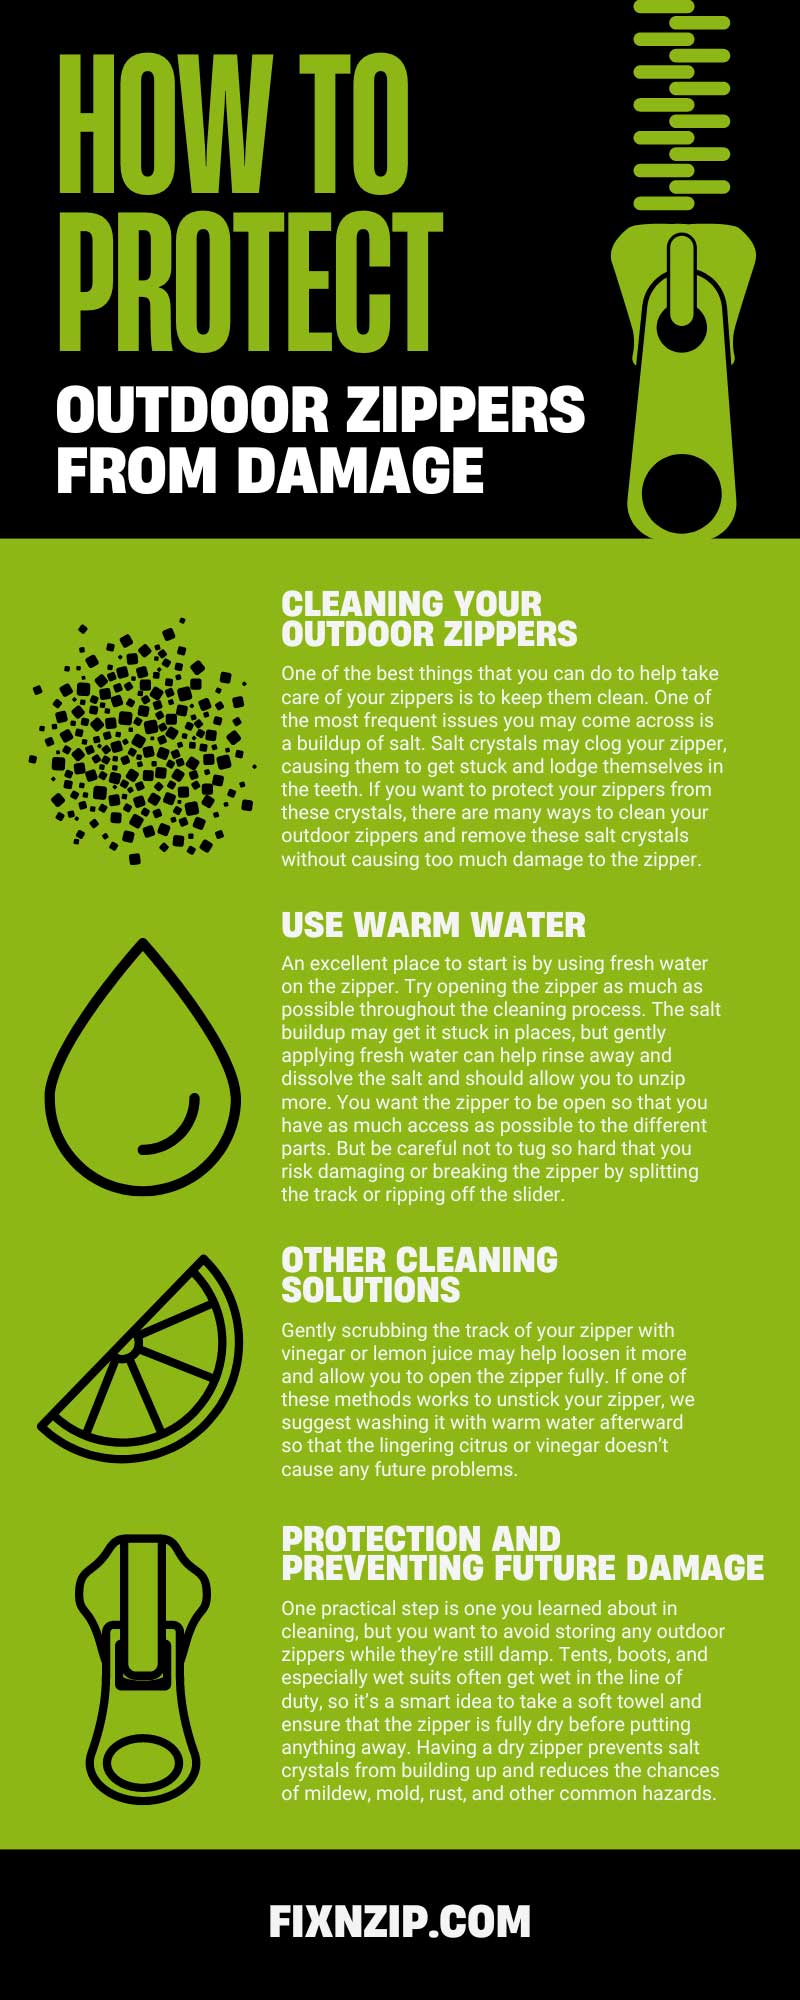
The zippers that we have on things we use in the great outdoors are the ones that need to stay in prime condition. However, these are also the ones that are most likely to suffer from wear and tear, salt buildup, rust, and other normal hazards due to regular storage in more potentially harmful environments. Some of the most common outdoor zippers are those found on tents, boots, wet suits, and other similar products. If you’re wondering how to protect outdoor zippers from damage, FixnZip has some helpful tips for keeping things in good condition, making repairs, and preventing any future damage.
One of the best things that you can do to help take care of your zippers is to keep them clean. One of the most frequent issues you may come across is a buildup of salt. Salt crystals may clog your zipper, causing them to get stuck and lodge themselves in the teeth. If you want to protect your zippers from these crystals, there are many ways to clean your outdoor zippers and remove these salt crystals without causing too much damage to the zipper.
An excellent place to start is by using fresh water on the zipper. Try opening the zipper as much as possible throughout the cleaning process. The salt buildup may get it stuck in places, but gently applying fresh water can help rinse away and dissolve the salt and should allow you to unzip more. You want the zipper to be open so that you have as much access as possible to the different parts. But be careful not to tug so hard that you risk damaging or breaking the zipper by splitting the track or ripping off the slider.
Gently applying fresh, warm water may help loosen things up, but we recommend taking a small brush, like a toothbrush or similar device, and scrubbing the zipper gently to try to loosen it up. Once again, it’s a good idea not to scrub so hard that you damage the material or affect the fabric surrounding the track.
If you still have jamming issues with your zipper even after cleaning it with fresh water, you may want to consider trying some other solutions. Gently scrubbing the track of your zipper with vinegar or lemon juice may help loosen it more and allow you to open the zipper fully. If one of these methods works to unstick your zipper, we suggest washing it with warm water afterward so that the lingering citrus or vinegar doesn’t cause any future problems.
You may need to try a special lubricant for particularly stubborn zippers or ones with more significant amounts of salt crystals. There are wide varieties of sprayable lubricants that can help you clean your outdoor zipper. WD-40 is a common example many people already have in their homes or garages, but we advise caution when using this spray on outdoor zippers. The standard lubricant may be perfectly fine for many metal zippers, but the chemicals may do more harm than good on zippers made from brass, nickel, rubber, or certain types of plastic. If you’re not positive about the material of your zipper, consider investing in a specialized zipper lubricant that you can find in most hardware or hobby shops.
After lubricating and cleaning your outdoor zipper, take a towel and gently dry it with gentle dabs. Once everything is clean and dry, we suggest opening and closing your zipper a few times to ensure it’s working smoothly and that there are no remaining snags or blockades.
When you want to protect your outdoor zippers from damage, cleaning is a great place to begin. But there are many more helpful tips we recommend following if you want to prevent future damage and clean less often in the future.
One practical step is one you learned about in cleaning, but you want to avoid storing any outdoor zippers while they’re still damp. Tents, boots, and especially wet suits often get wet in the line of duty, so it’s a smart idea to take a soft towel and ensure that the zipper is fully dry before putting anything away. Having a dry zipper prevents salt crystals from building up and reduces the chances of mildew, mold, rust, and other common hazards.
For additional protection, many outdoor zippers benefit from some form of protective coating such as rubber, wax, or beeswax. These coatings not only help keep zippers dry but help keep dirt, grime, and other debris out of the inner workings. Many zipper repair kits come with some form of protective coating you can apply, but one of the most vital steps is applying these coatings after performing a thorough cleaning and allowing it to dry. Applying a protective coating to a zipper with dirt or salt on the track may lead to further damage.
When storing anything with an outdoor zipper on it, we recommend keeping the zipper zipped up to keep everything held tightly together and prevent any outside forces or hazards from disrupting the track or messing up the teeth. However, while you want to keep the zipper closed, we suggest regular lubrication every one to two months. Open and close the zipper and perform the necessary cleaning steps to keep it in good condition.
Due to their frequent exposure to the elements of nature and because people often store them in harsher conditions than our day-to-day wardrobe, outdoor zippers frequently suffer from issues. They require regular maintenance, cleaning, and repair. Performing a small handful of extra steps on a regular basis will save your equipment from needing replacements and additional work, keeping it in working condition for longer.
If you’re looking for additional information on how to fix a zipper, the experts at FixnZip have the help you need. FixnZip offers a variety of zipper replacement kits and articles on zipper maintenance and repair and has trained staff ready to address your questions, comments, and concerns. Visit our website for more information, or contact us today to get the answers you need.